Getting Started
By the end of this guide you will have two NanoPing nodes connected to each other, carrying a UDP stream over one or more network links. You will know it works when the pipeline log shows New Session Bound.
The setup looks like this:
- Node A and Node B each run NanoPing.
- Both nodes join your organization's cloud hub, hosted by NanoPing, as soon as they are activated. The hub is the address book that lets nodes find each other, and it lets you manage both nodes from either dashboard.
- A sender pipeline on one node and a receiver pipeline on the other carry your application's UDP traffic between them using Raft, NanoPing's transport protocol.
A hub is not strictly required, but without one you configure each node from its own dashboard, on each machine.
Before you begin
- Two supported machines: Linux (x86-64 or ARM64) or macOS (ARM64). See Supported systems.
- Administrator access: NanoPing commands run with
sudo. - A NanoPing account: you can register at user.nanoping.com while activating your first device. New accounts get a 30-day trial license; contact NanoPing for a full license.
- Internet access on both machines, so they can reach your organization's cloud hub.
- Compatible NanoPing versions on both nodes: from version 11.0.0, Raft can carry traffic between nodes running the same major version. Before version 11, both nodes had to run exactly the same version.
- A way to connect the two machines: two Ethernet cables (recommended), one cable, or a network where they can reach each other. See Choose a network setup.
- The IP address of each network interface you want NanoPing to use, on both machines.
Step 1: Install NanoPing on both machines
Run the install script on both Node A and Node B:
curl -sS https://get.nanoping.com | sh
The installer puts np in ~/.local/bin, where NanoPing can update itself, and links /usr/local/bin/np to it so that sudo np finds it. Creating that link can ask for your password. It also asks whether to add ~/.local/bin to your PATH. A successful install looks like this:
Installing latest version of np (NanoPing 11.0.0) …
✓ finished downloading and checked it
✓ installed np to /home/user/.local/bin/np
Linking /usr/local/bin/np to /home/user/.local/bin/np needs sudo:
✓ linked /usr/local/bin/np to /home/user/.local/bin/np
Add ~/.local/bin to your PATH in ~/.profile, ~/.bashrc? [Y/n] y
✓ added /home/user/.local/bin to the PATH in ~/.profile, ~/.bashrc
✓ configuration storage defaults to /home/user/nanoping (override with --app-data)

Go to https://docs.nanoping.com for documentation.

Now run "sudo np up" to start NanoPing as a daemon
NanoPing stores its configuration and device identity in the folder on the configuration storage line. You can choose a different folder with --app-data; if you do, use the same flag on every np command for that installation. See Install and update for the installer's options.
Sign in or register at user.nanoping.com and download the build for your system there. Every step after this one is the same.
macOS only: allow NanoPing to run
The first time you run np on a Mac, macOS stops it with "np" Not Opened, because Apple could not verify the developer.
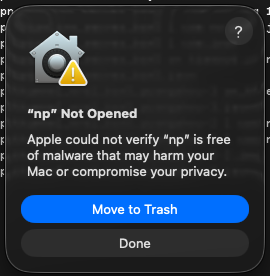
To allow it:
-
Click Done (not Move to Trash).
-
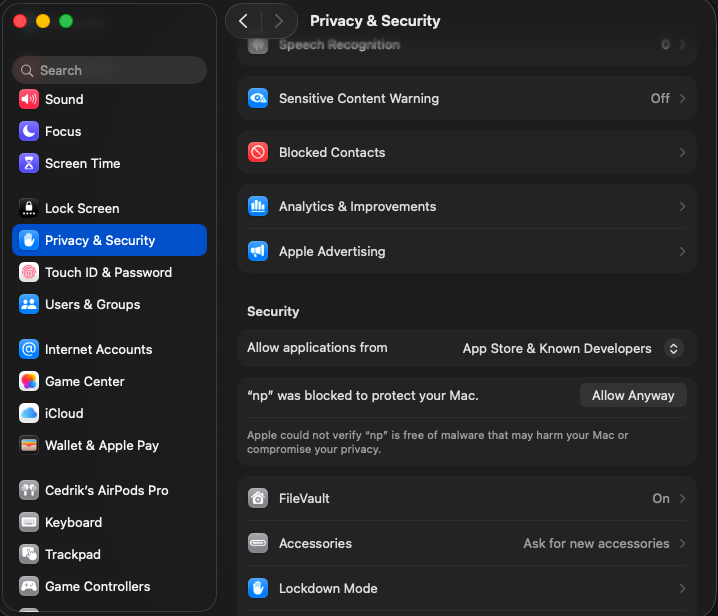
Open System Settings → Privacy & Security and scroll to Security. Next to "np" was blocked to protect your Mac, click Allow Anyway.
-
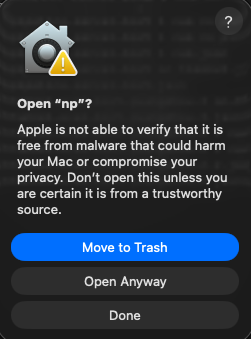
Run the command again. When macOS asks Open "np"?, click Open Anyway.
-
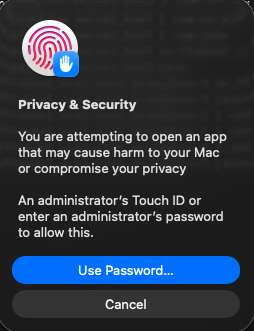
Confirm with Touch ID or your administrator password.
Step 2: Start and claim each node
Claiming links a device to your NanoPing account and activates its license. Do this on both machines.
-
Start NanoPing:
sudo np up -
NanoPing prints a claim link and starts the dashboard:
You need to activate this device. Go to the following link to sign in: https://user.nanoping.com/auth/claim?id=…Started. Serving dashboard on http://127.0.0.1:8081 -
Open the link and sign in, or register if you don't have an account yet. You can sign in with Google, Microsoft, GitHub, or email and password.
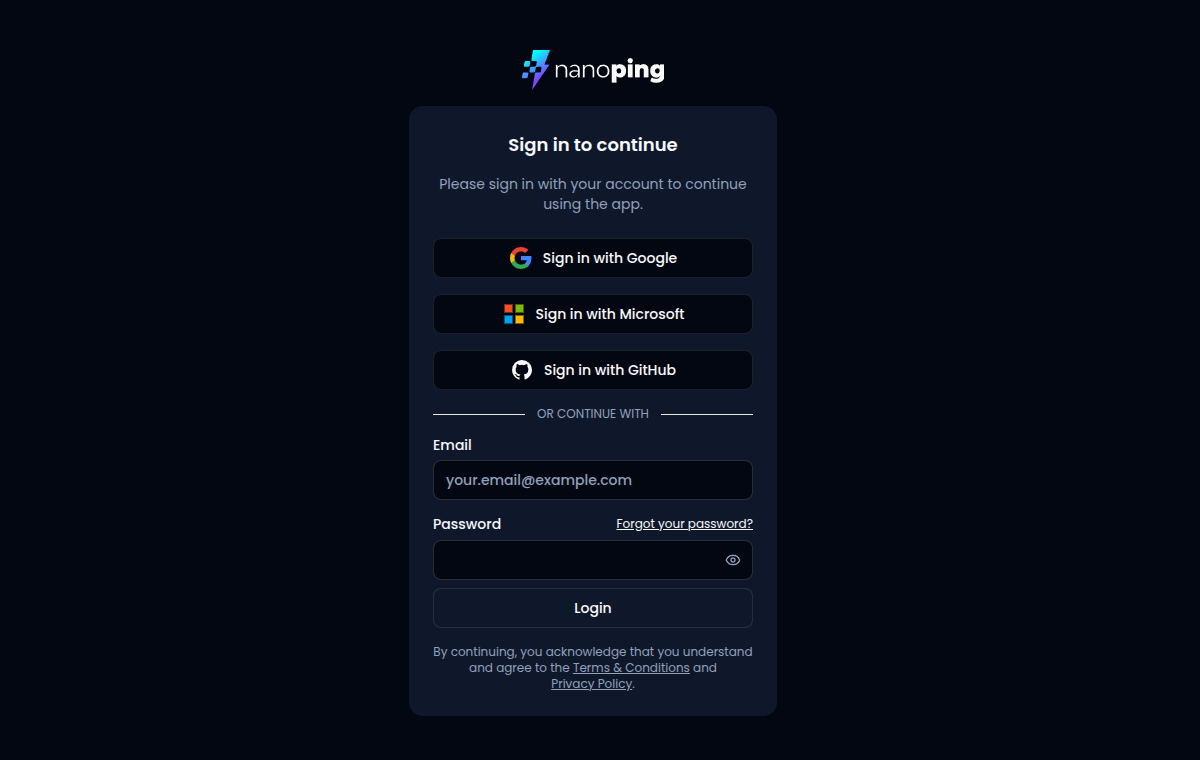
-
The Connect this device? page shows which device you are activating and which organization it will join. Check both, then click Connect device.
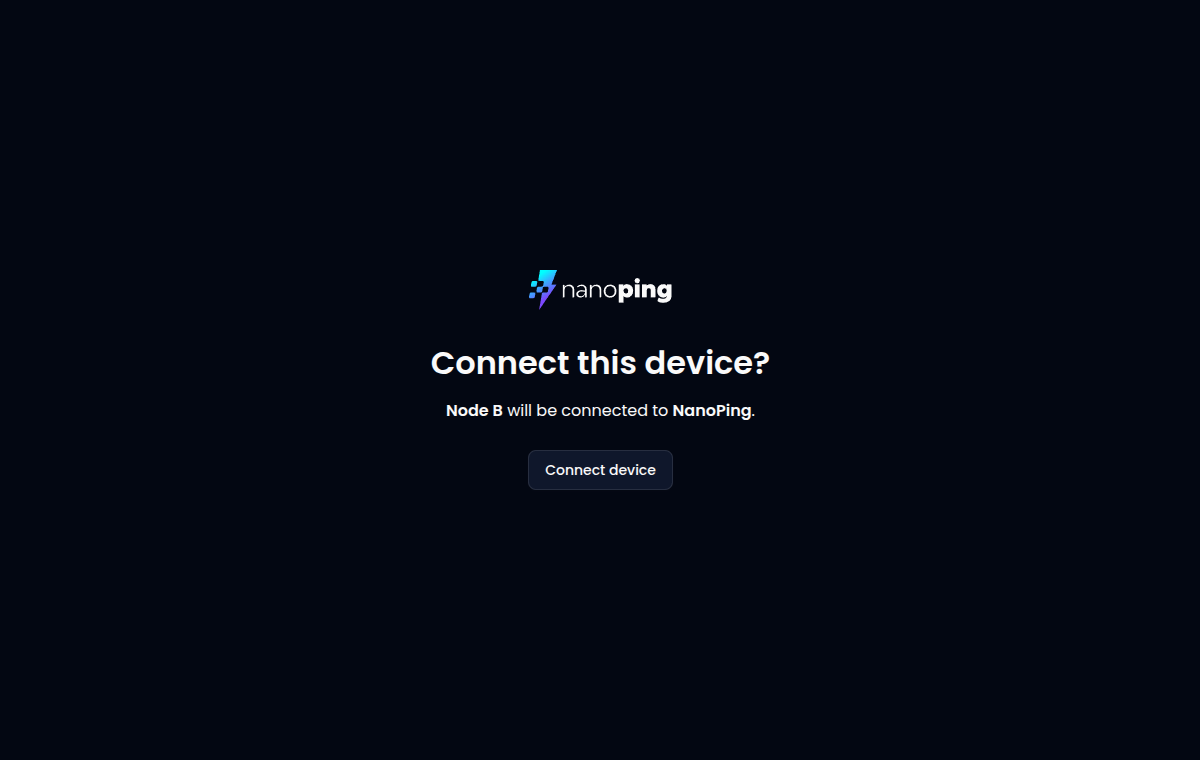
When you see Device connected, you can close the window.
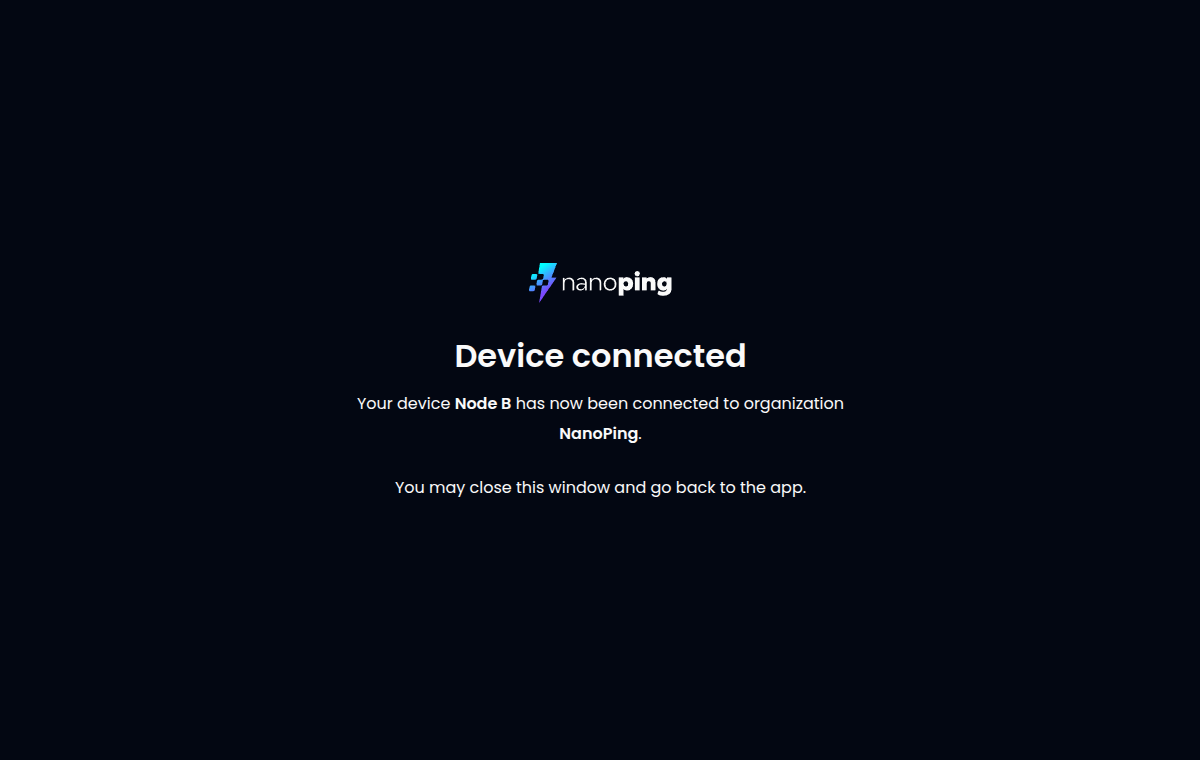
-
Open the dashboard at http://localhost:8081. The first time, it asks whether to enable automatic error reporting. Choose Enable or Disable; you can change this later on the General page of Settings.
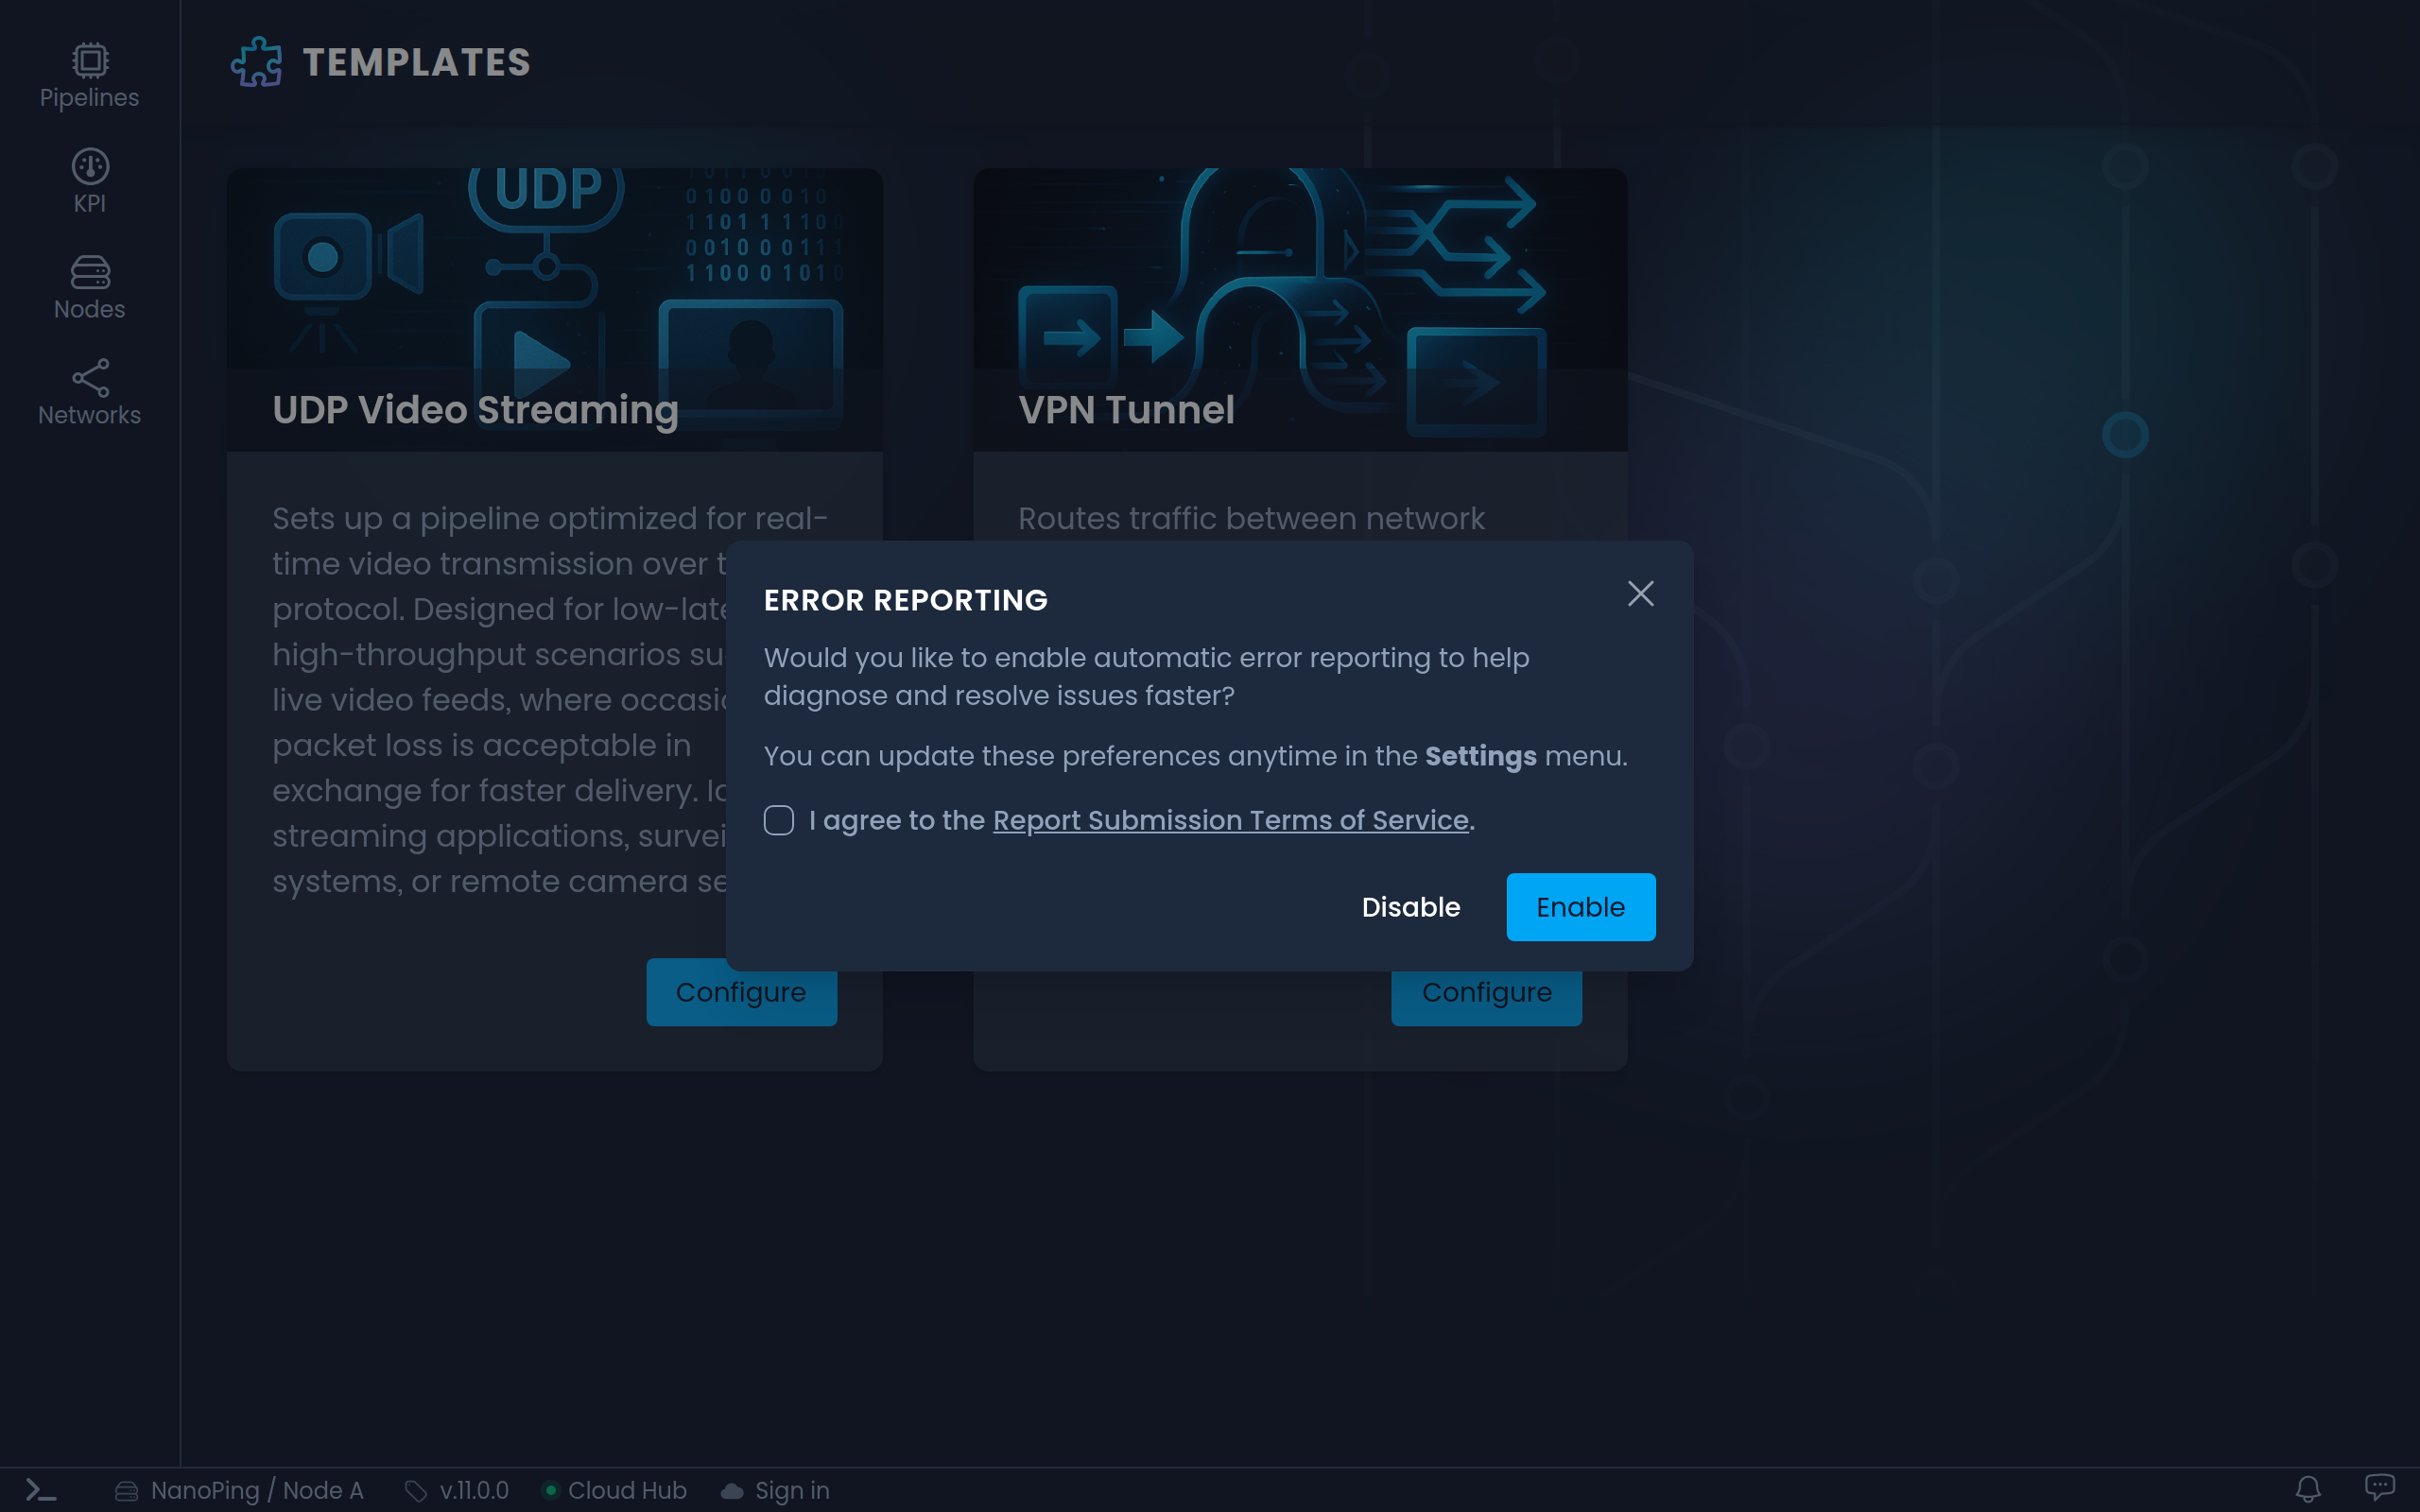
NanoPing runs as a daemon, so it keeps running after you close the terminal. It does not start again after a reboot unless you install it as a service.
Once activated, the node joins your organization's cloud hub automatically; there is nothing to set up. Deactivating a device later frees its license seat.
Step 3: Check that both nodes are on your cloud hub
Both nodes should now be on your organization's cloud hub. Open the Nodes page on either dashboard; Node A and Node B should both be listed.
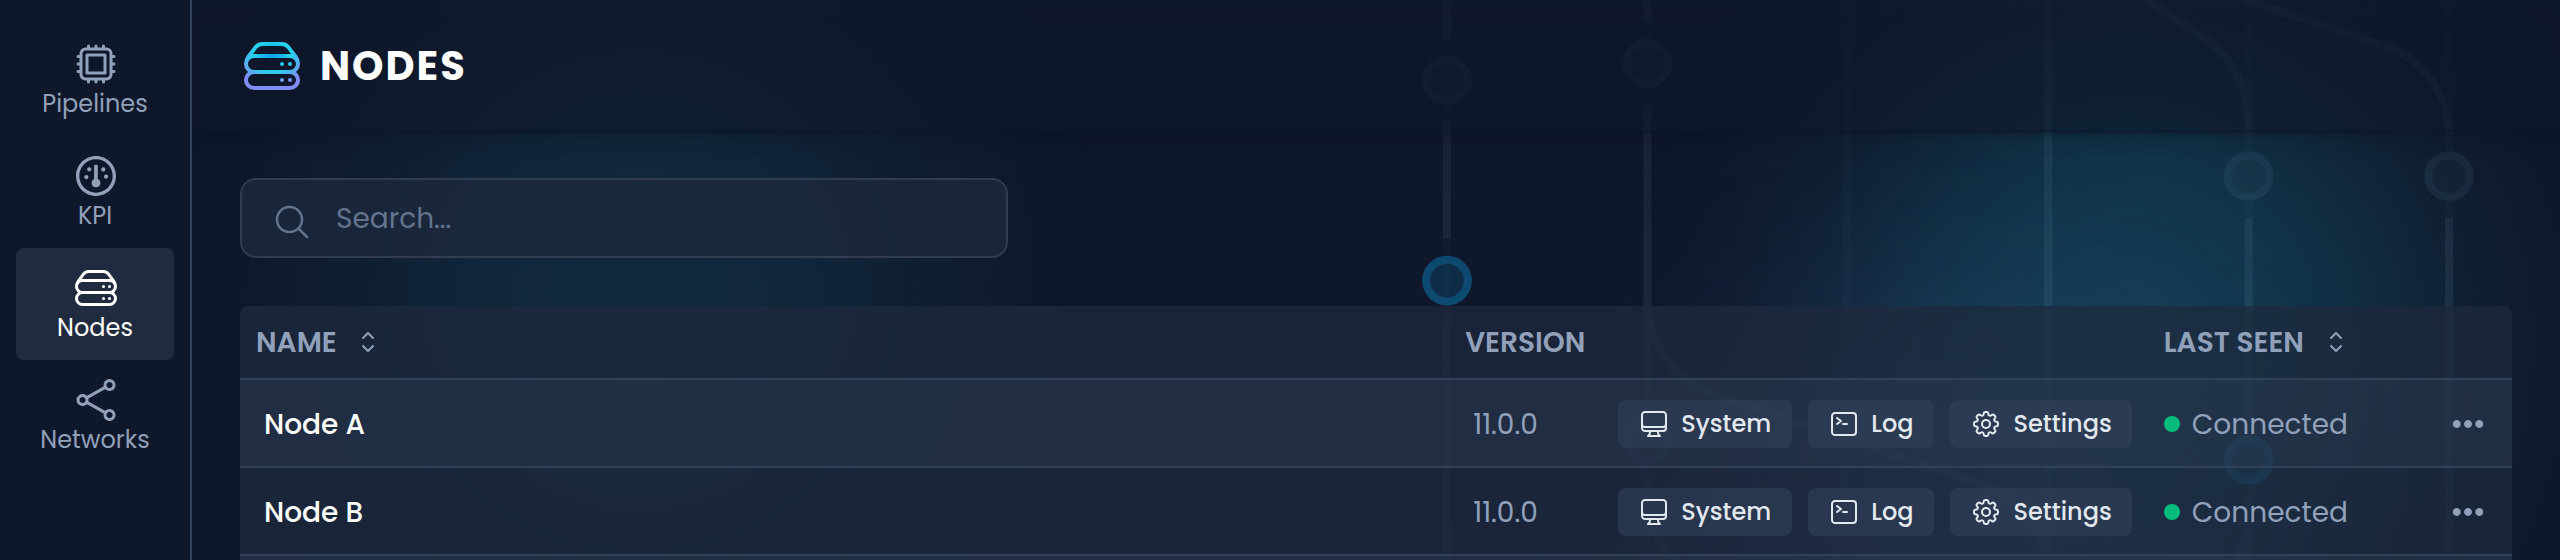
The status bar at the bottom of the dashboard shows Cloud Hub when the node is connected to it.
From any node's row you can open its system, logs and settings, and switch between nodes without leaving the page. This means you can do the rest of this guide from one machine.
If a node is missing, check that it was activated into the right organization and that it has internet access. You can leave or rejoin the cloud hub on the Hub Connection page of its Settings.
How Raft works
Raft is NanoPing's transport protocol. It takes your application's traffic, spreads it across every available connection, repairs what gets lost on the way, and delivers it to the other side in order and within a latency budget you set.
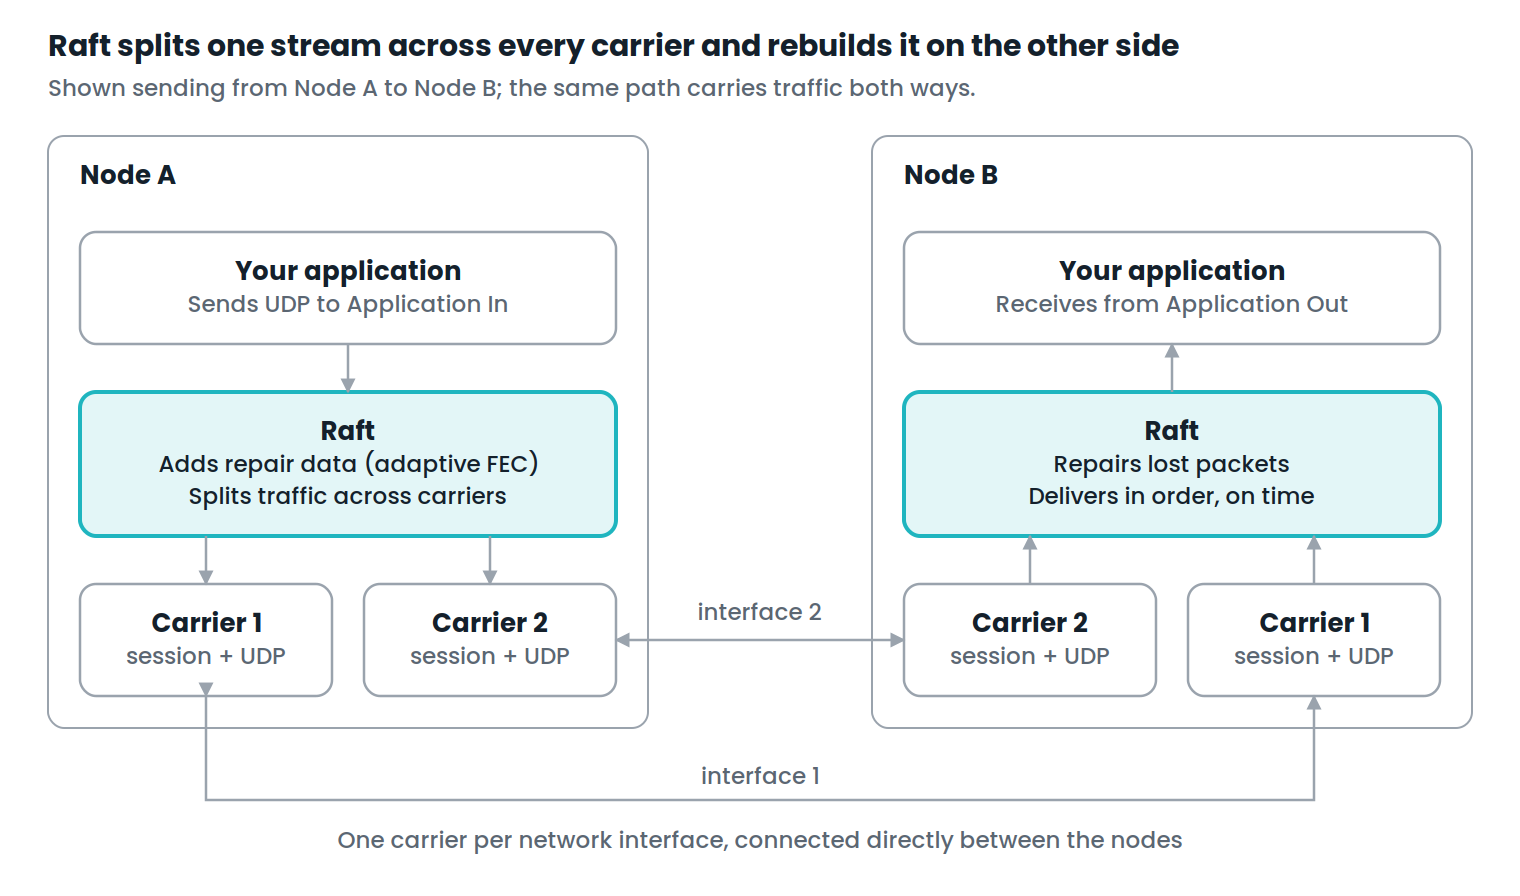
A Raft pipeline has three building blocks:
- Stream: your application's traffic going into and out of Raft, such as the UDP stream from the template.
- Carrier: one path between the nodes, usually one per network interface. Each carrier has its own UDP port.
- Session: the handshake that confirms a carrier reaches the right peer. A bound session is what the log reports as New Session Bound.
On top of this, Raft gives you three tools for difficult networks:
- Adaptive Forward Erasure Correction: Raft sends repair packets alongside your data, so the receiver can rebuild lost packets without waiting for a resend. Unlike fixed-rate FEC, Raft adjusts the amount of repair data to the packet loss it measures.
- Integrated jitter buffer: each stream has a
timeout, its latency deadline in milliseconds; packets older than this are dropped. An optionaljitter_bufferholds packets briefly for smoother playout, and must be between0andtimeout. - Bandwidth-aware load distribution: by default, traffic is shared round-robin across carriers. Give every carrier a priority (higher number wins) and Raft fills the preferred carrier first, spilling over only as it nears capacity.
Choose a network setup
Before you create the pipelines, connect the two machines in a way you know works. Then, if something goes wrong later, you know the network is not the cause. Pick one of these setups:
| Setup | What you need | Best for |
|---|---|---|
| A: Two Ethernet cables (recommended) | Two Ethernet ports on each machine (USB Ethernet adapters work) and two cables | Seeing NanoPing bond two real links |
| B: One Ethernet cable with simulated loss and delay | One Ethernet port on each machine and one cable | Trying NanoPing with minimal hardware |
| C: Any network where the nodes can reach each other | Tailscale, public IP addresses, or a shared network | Testing over networks you already have |
Setup A: Two Ethernet cables
Connect the machines with two cables, port to port. Each cable is its own small network with fixed IP addresses, so Raft gets two independent carriers:
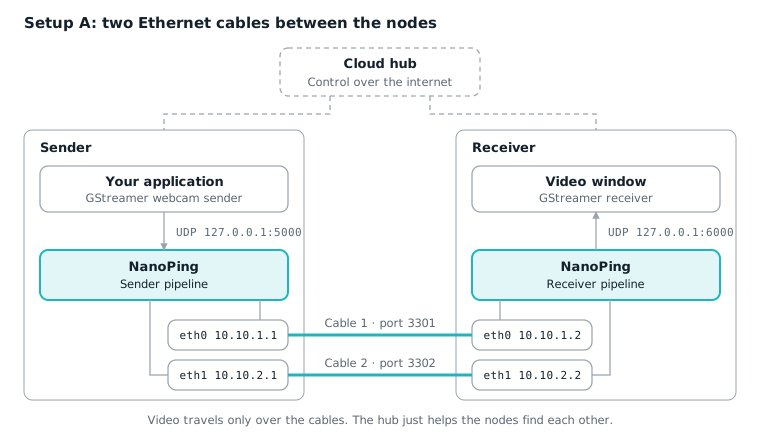
The addresses for each cable:
| Cable | Sender | Receiver |
|---|---|---|
| Cable 1 | 10.10.1.1 | 10.10.1.2 |
| Cable 2 | 10.10.2.1 | 10.10.2.2 |
Leave the gateway (router) empty on these connections. Your machines then keep using Wi-Fi or their main network for the internet, which the cloud hub needs.
Set fixed IP addresses on Linux
-
Find the names of your Ethernet interfaces. They look like
eth0,enp3s0or, for USB adapters,enx…:nmcli device status -
On the Sender, give each interface its address. Replace
eth0andeth1with your interface names:sudo nmcli connection add type ethernet ifname eth0 con-name nanoping-1 \ipv4.method manual ipv4.addresses 10.10.1.1/24 ipv6.method disabledsudo nmcli connection add type ethernet ifname eth1 con-name nanoping-2 \ipv4.method manual ipv4.addresses 10.10.2.1/24 ipv6.method disabledsudo nmcli connection up nanoping-1sudo nmcli connection up nanoping-2 -
On the Receiver, run the same commands with
10.10.1.2/24and10.10.2.2/24.
To undo this later, run sudo nmcli connection delete nanoping-1 nanoping-2.
Set fixed IP addresses on macOS
- Open System Settings → Network and select the first Ethernet adapter (for example USB 10/100/1000 LAN).
- Click Details → TCP/IP, and set Configure IPv4 to Manually.
- Enter the IP address from the table, set Subnet mask to
255.255.255.0, leave Router empty, and click OK. - Repeat for the second adapter.
You will also need the interface names, such as en5 and en6, for the next step. Run networksetup -listallhardwareports to see which name belongs to which adapter.
Check the links
From the Sender, ping both Receiver addresses:
ping -c 3 10.10.1.2
ping -c 3 10.10.2.2
Both must answer. When you create the pipelines in Step 4, add one connection per cable on the Connections screen.
The template also puts Loss Constant and Delay Constant components on the Sender in this setup (see Setup B). Using them is optional: set them to 0 to test the real cables, raise them to simulate a worse link, or use other tools instead, such as Linux tc netem:
sudo tc qdisc add dev eth0 root netem loss 5% delay 50ms   # make eth0 worse
sudo tc qdisc del dev eth0 root                            # back to normal
Setup B: One Ethernet cable with simulated loss and delay
With only one cable, both carriers run over the same link: the same IP addresses, with a different port for each carrier.
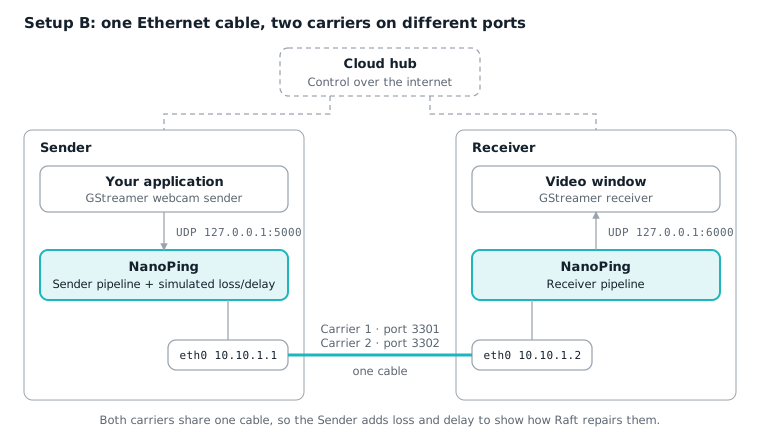
- Connect the machines with one cable and give that link fixed addresses as in Setup A:
10.10.1.1on the Sender and10.10.1.2on the Receiver. Skip the second cable. - Check the link with
ping -c 3 10.10.1.2from the Sender. - In Step 4, add two connections to the same address with different ports:
10.10.1.2:3301and10.10.1.2:3302.
Both carriers share one cable, so this setup cannot show bonding or what happens when a link fails. Instead, you make the link worse on purpose and watch Raft repair it. The template puts a Loss Constant and a Delay Constant component on each carrier of the Sender pipeline:
- Loss Constant → Loss Probability: the percentage of packets to drop, for example
5for 5%. It is0by default. - Delay Constant → Delay and Jitter: extra delay and variation in milliseconds, added in both directions. By default they are
50and1.
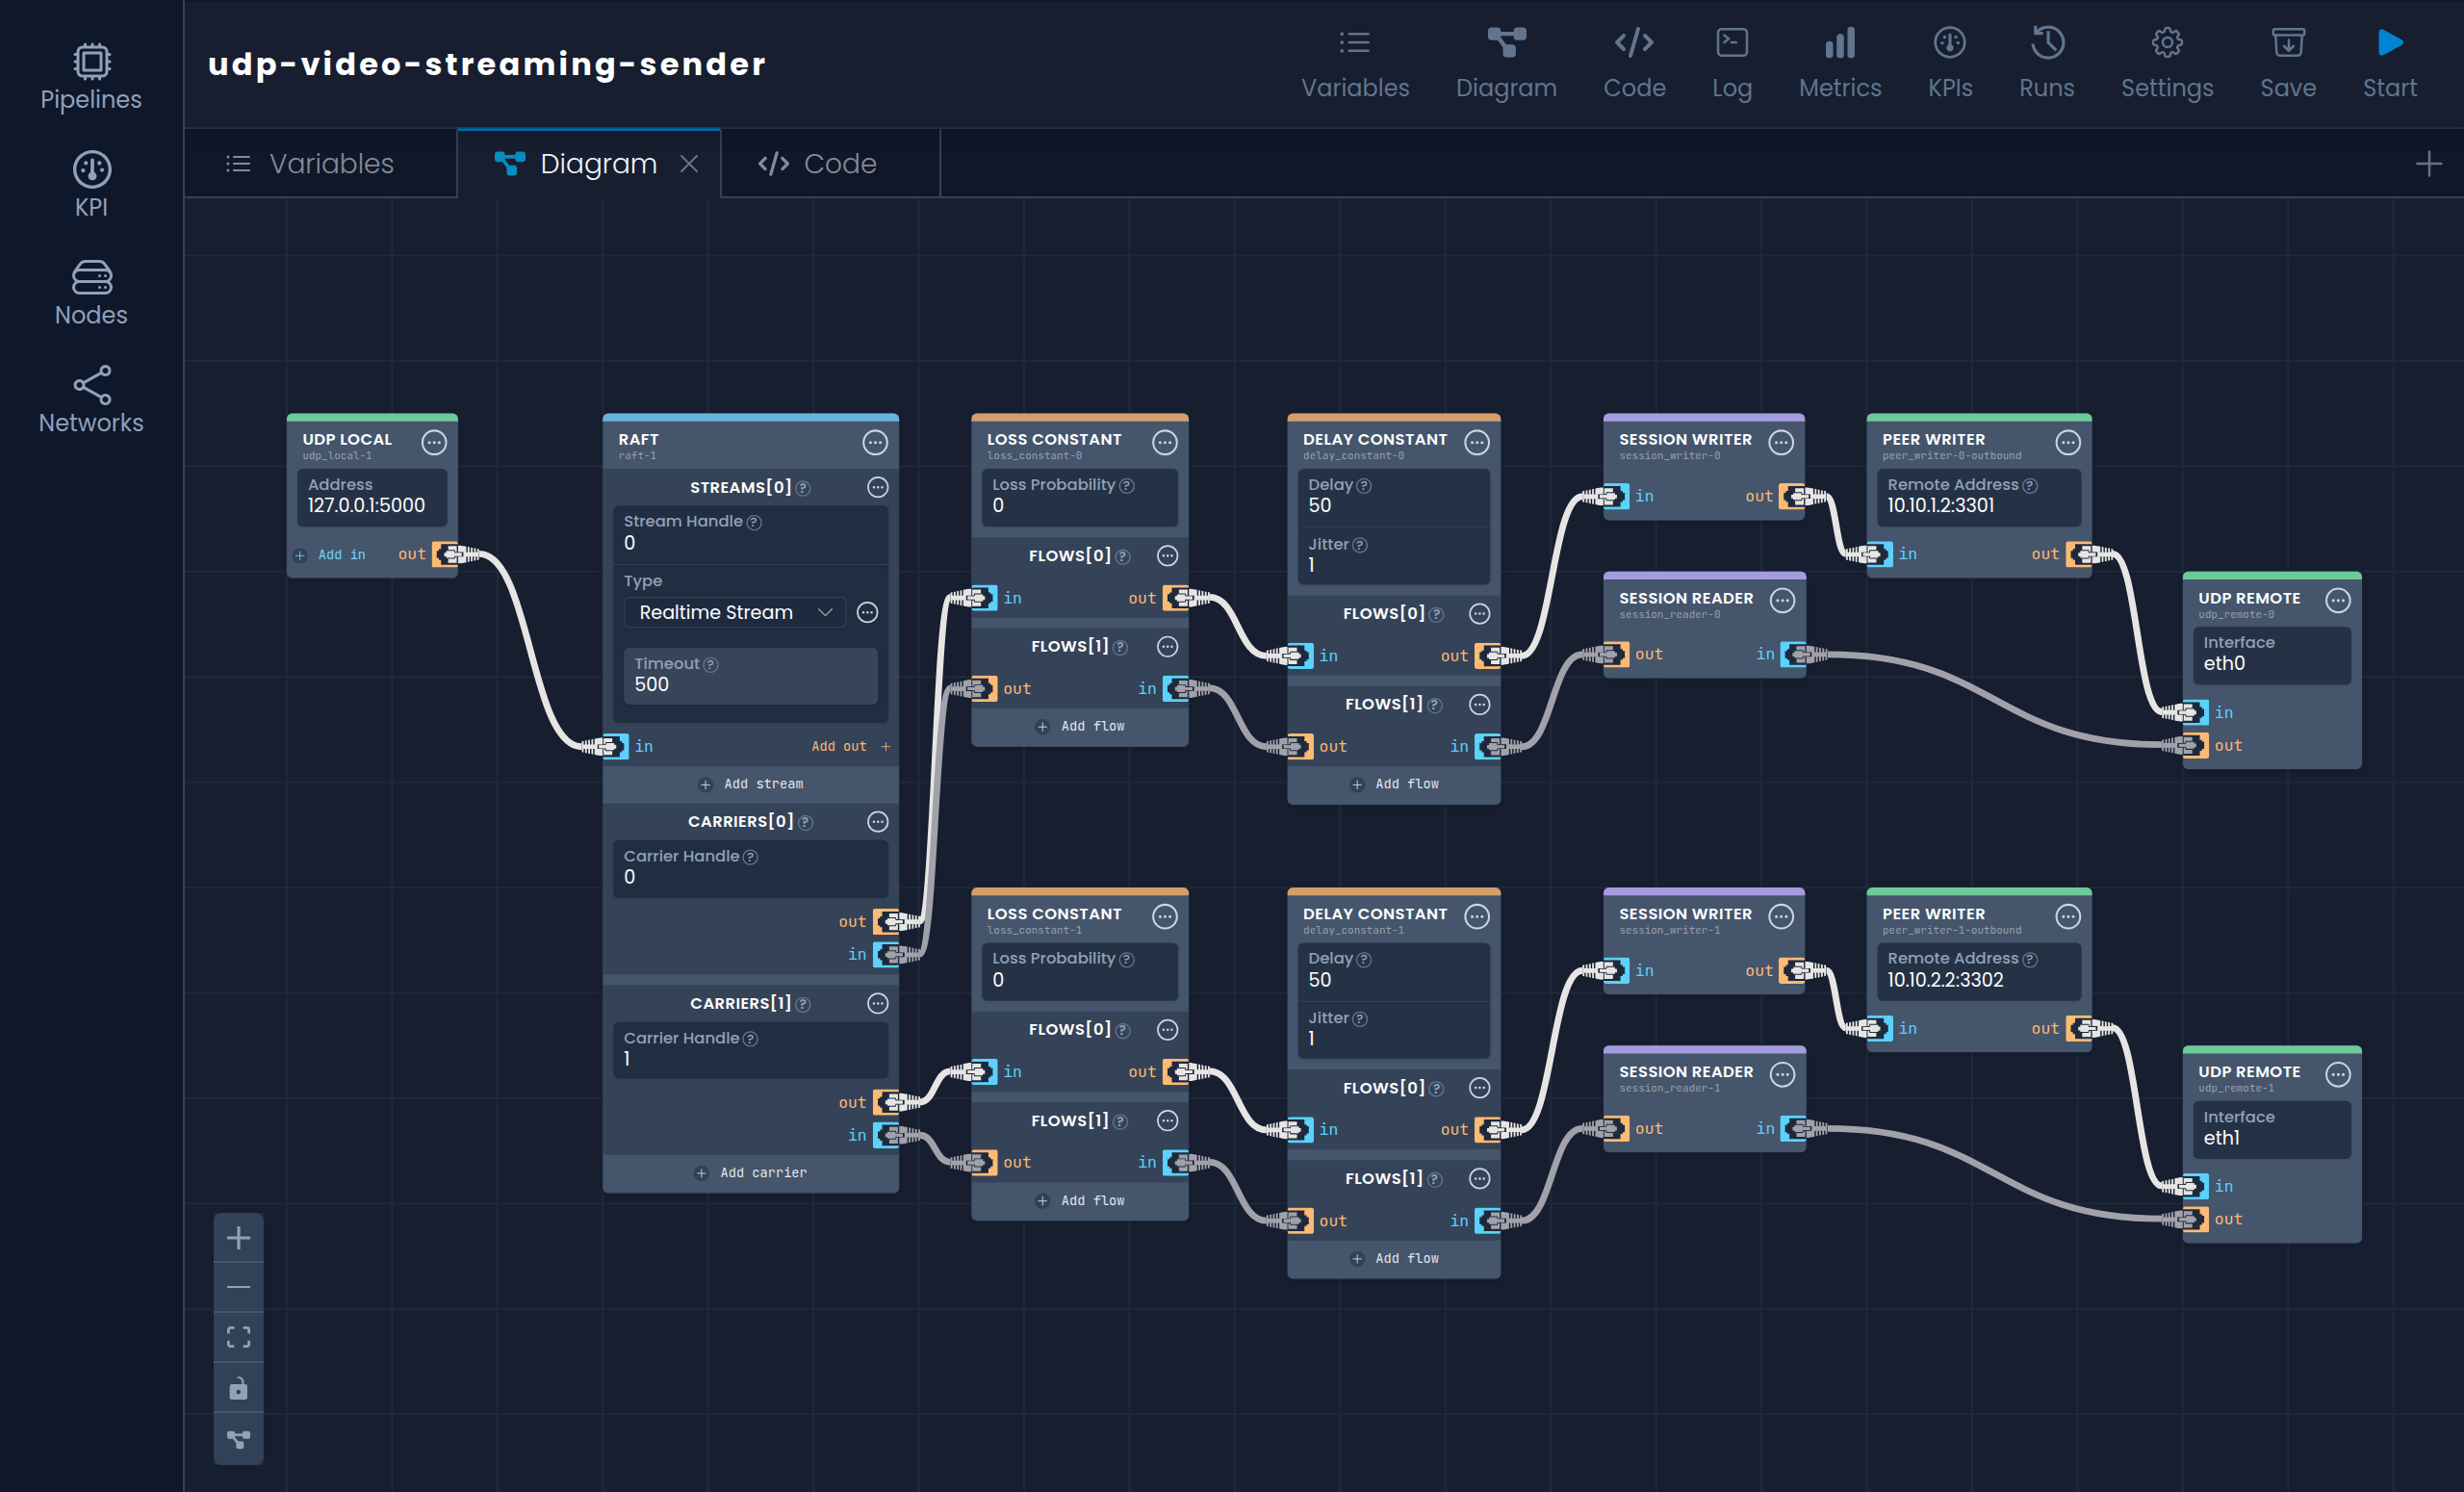
Once the video is running in Step 6, raise Loss Probability on one or both carriers (try 5, then 10 or 20), click Save & Deploy, and watch the picture. Raft repairs the lost packets, so the video keeps playing smoothly up to surprisingly high loss.
Setup C: Other networks
Any network works as long as the two nodes can reach each other directly:
- Tailscale: install Tailscale on both machines, sign in to the same tailnet, and use the Receiver's Tailscale address (
100.x.y.z). - Public IP addresses: the Receiver needs a public IP address, and any router in front of it must forward the UDP connection ports (for example
3301and3302) to it. - The same Wi-Fi or office network: use the Receiver's address on that network.
Many Wi-Fi access points, especially guest and office networks, use client isolation: devices on the network can reach the internet but not each other. NanoPing cannot work through that. If the ping test below fails on a shared network, use Setup A or B instead.
Before you continue: ping test
Whatever the setup, check from the Sender that each Receiver address answers:
ping -c 3 <receiver-address>
A ping only proves the machines can reach each other. NanoPing also needs the UDP connection ports to be open. Ubuntu's firewall is off by default; if you have turned it on, allow the ports on the Receiver with sudo ufw allow 3301:3302/udp. On macOS, allow incoming connections for np if the firewall asks.
Step 4: Create the pipelines from the UDP template
The UDP Video Streaming template builds a matching pair of pipelines, one on each node, with Raft and the session components already in place. Work from either dashboard; through the hub it can create pipelines on both nodes. For all creation options, see Creating a pipeline.
-
Click Add in the upper-right corner, then choose the UDP Video Streaming template.
-
Read the introduction screen and click Next.
-
Nodes: set Sender Node to Node A and Receiver Node to Node B. If Node B is not in the list, go back to Step 3.
-
Application In/Out: enter the address and port where your application sends UDP traffic into NanoPing, and where NanoPing delivers it on the other side. For a local test, use the loopback address, for example
127.0.0.1:5000. -
Connections: add one connection per carrier. Enter the Receiver's address and port, and optionally the network interface to use on each node (Sender Interface and Receiver Interface). For Setup A, that is
10.10.1.2:3301oneth0and10.10.2.2:3302oneth1. For Setup B, use10.10.1.2:3301and10.10.1.2:3302.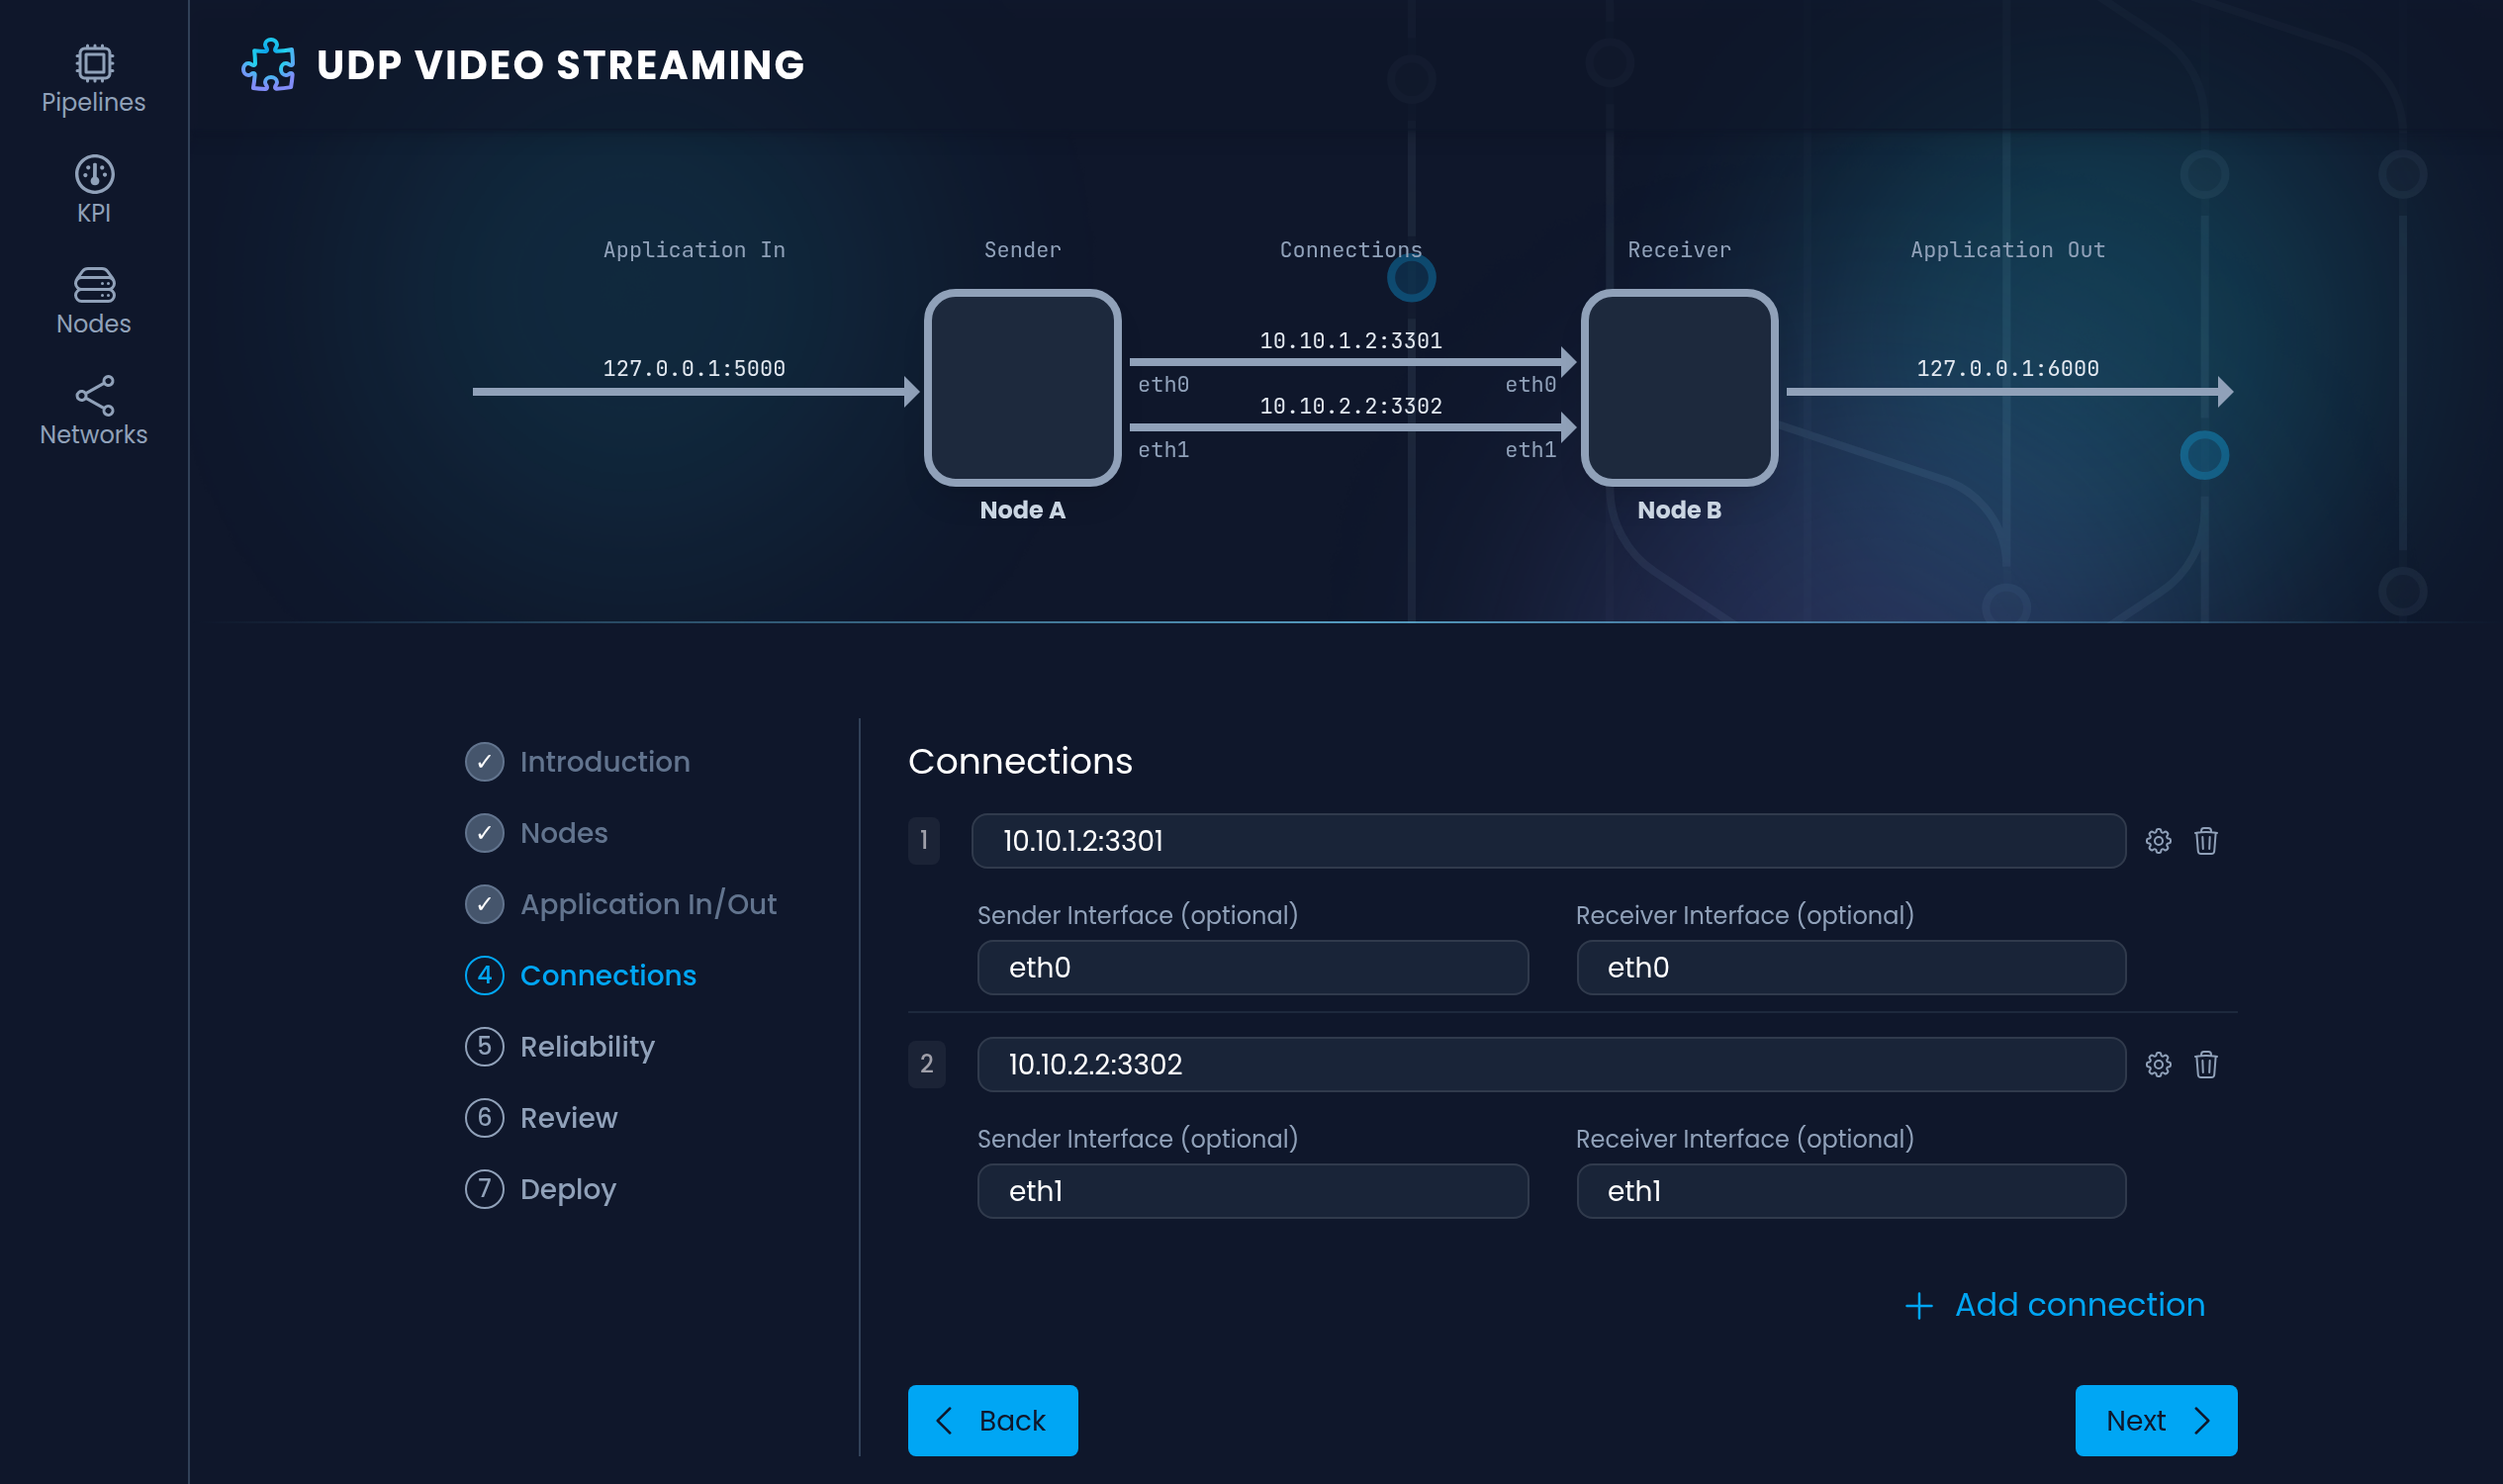
-
Reliability: set the allowed latency in milliseconds. It must be higher than the real latency of your slowest link, or no data will get through. 500 ms is a safe starting point.
-
Review your settings; you can go back to any step to change them.
-
Click Deploy. You will see links to the two new pipelines and a button to start both.
Give each pipeline a clear name, such as Sender and Receiver. It makes the Nodes and KPI pages much easier to read once you have more pipelines.
Reference: the two pipelines
These are the settings for Setup A. The receiver listens on its connection ports, and the sender connects to the receiver's address on those same ports.
| Setting | Sender (Node A) | Receiver (Node B) |
|---|---|---|
| Application In / Out | Receives UDP from your application on 127.0.0.1:5000 | Delivers UDP to your application on 127.0.0.1:6000 |
| Connection 1 | Connects to 10.10.1.2:3301 through eth0 | Listens on 10.10.1.2:3301 on eth0 |
| Connection 2 | Connects to 10.10.2.2:3302 through eth1 | Listens on 10.10.2.2:3302 on eth1 |
| Simulated loss and delay | Loss 0, delay 50 ms, jitter 1 ms on each carrier | None |
| Raft stream timeout | 500 ms | 500 ms |
Open a pipeline's Code tab to see its full configuration, and see JSON schema for how the file is put together. The Two carriers reference setup has a ready-made pair of these pipelines to import instead.
Step 5: Start the pipelines and verify the link
Click Start for both pipelines. Then open a pipeline to bring up the pipeline viewer and open the Log tab at the bottom of the screen. Your nodes are connected when you see these entries:
10/01/2026 09:41:11 New Session Bound
10/01/2026 09:41:11 Raft Stream Enabled
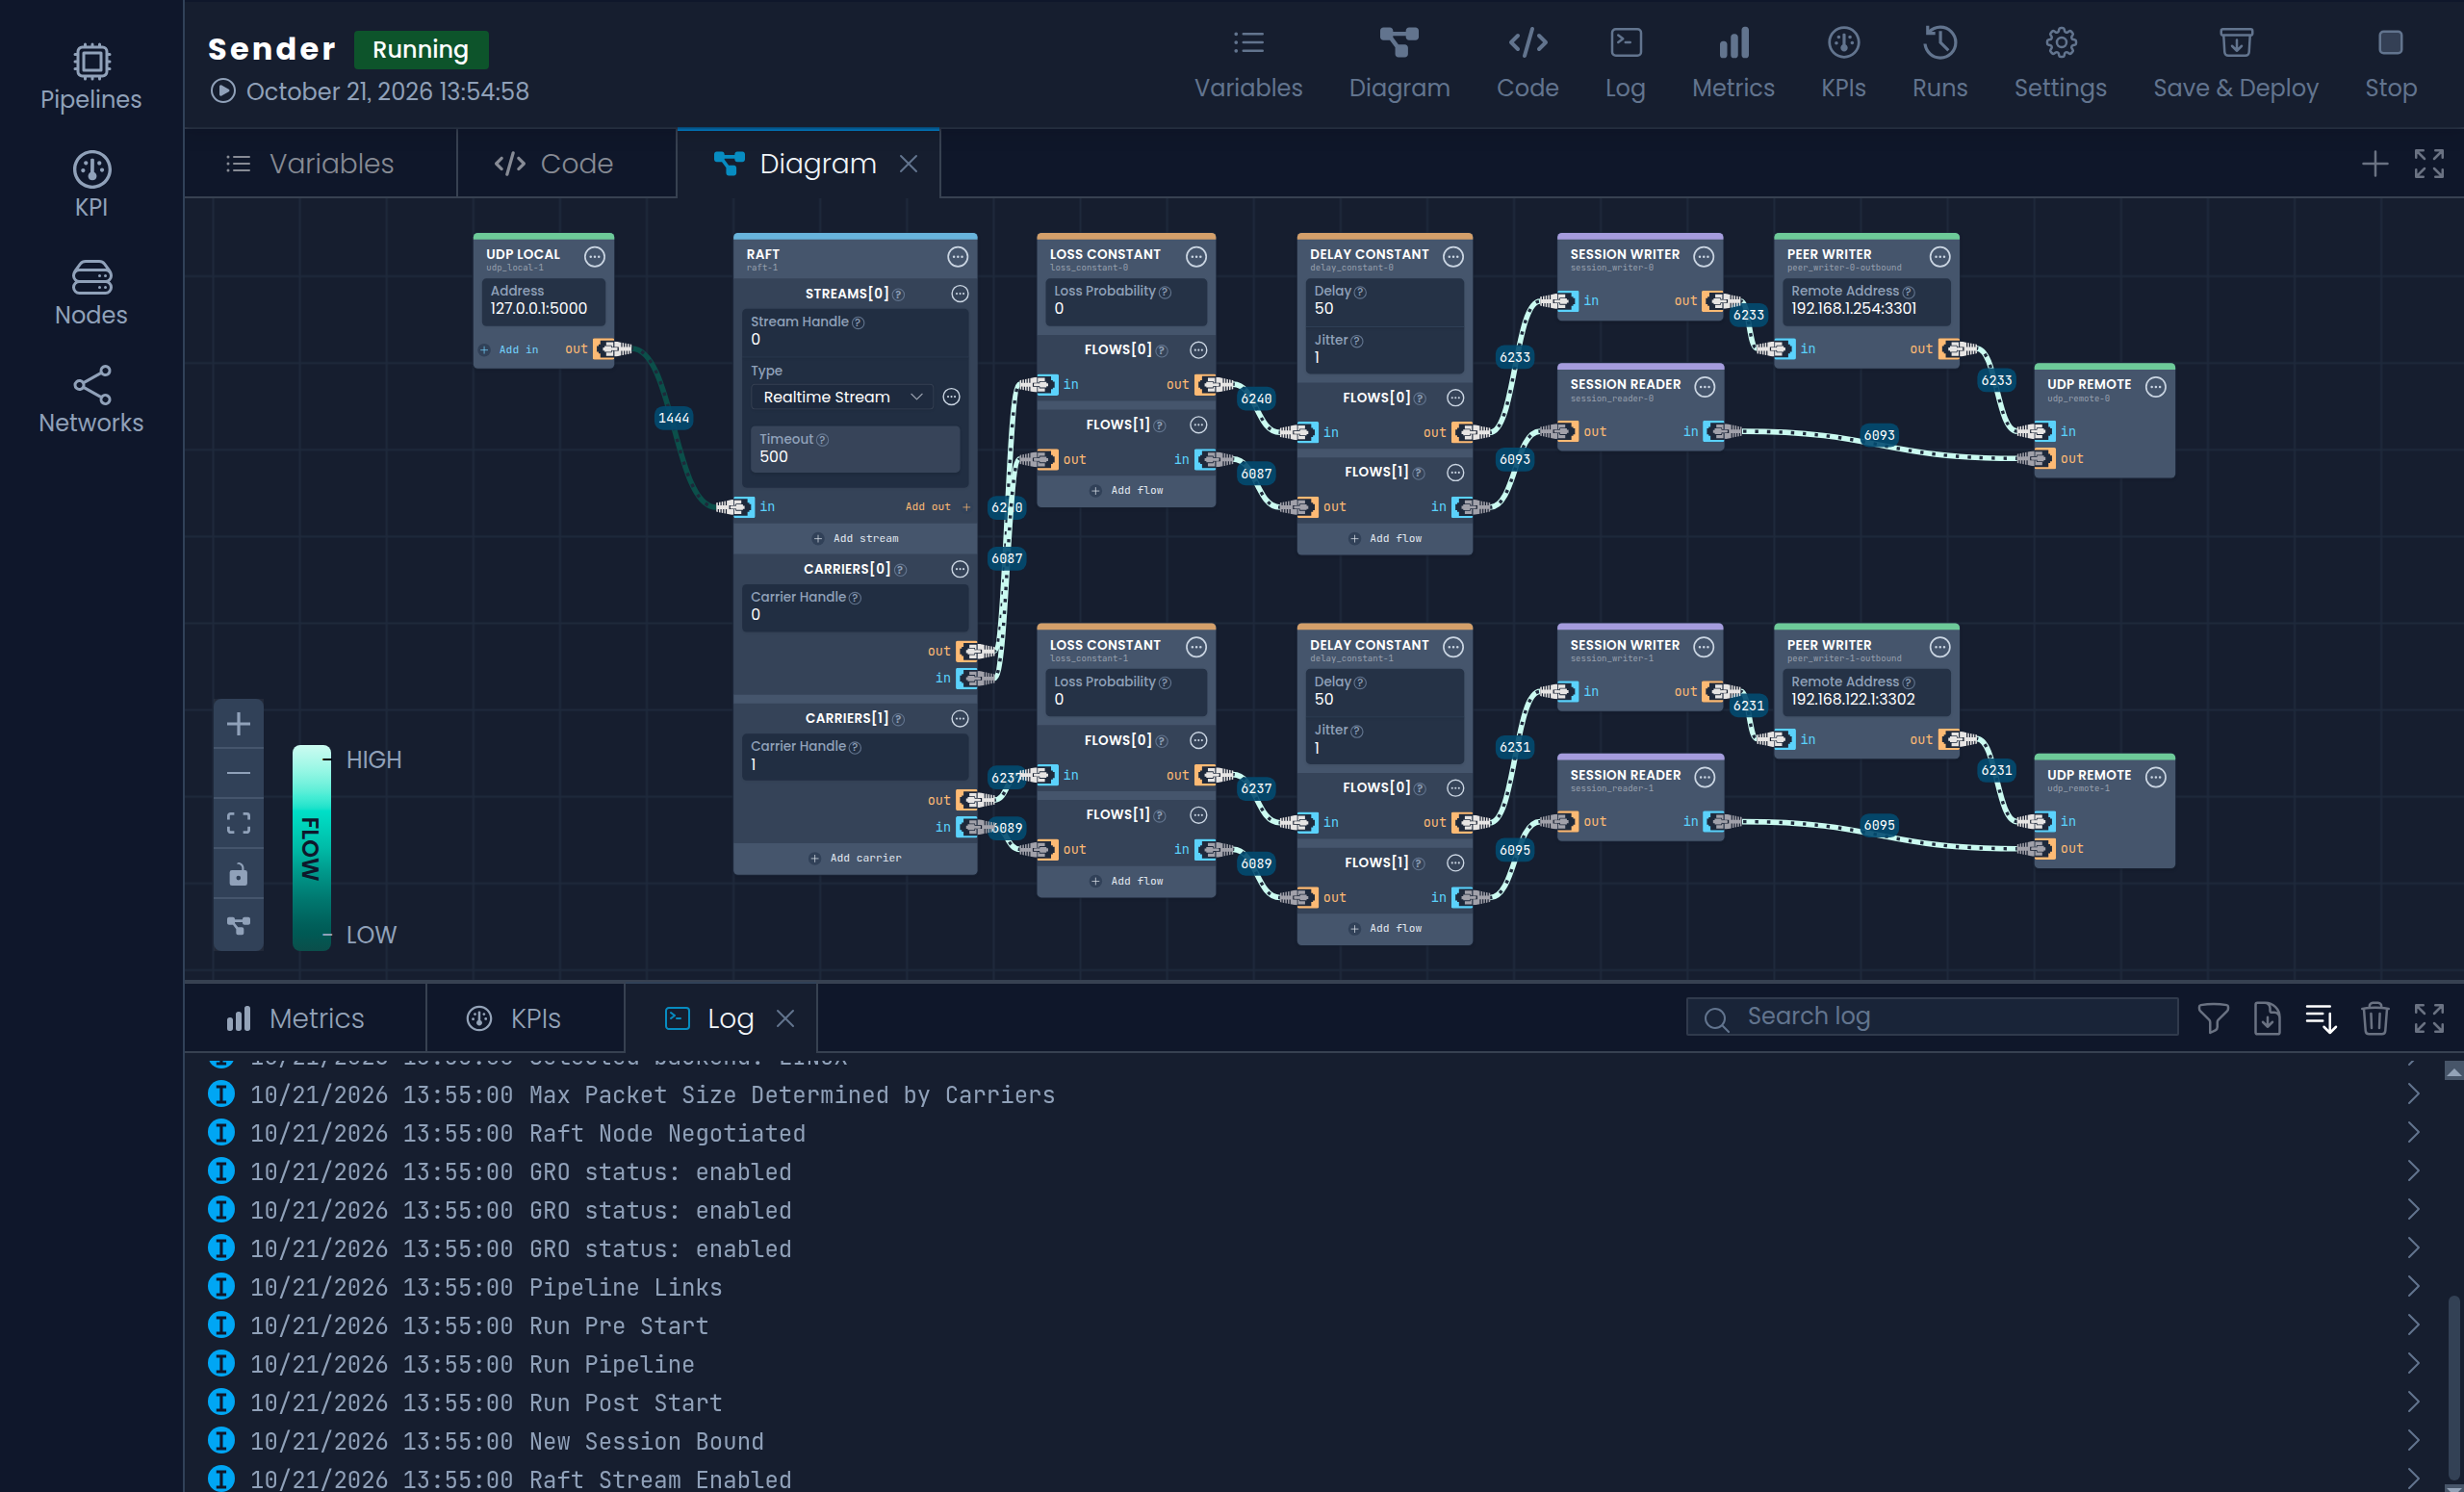
- New Session Bound means the node found its peer over a carrier and the two agreed on a session. You get one per carrier; click the line to expand it and see which session reader it came from.
- Raft Stream Enabled means Raft is ready to carry your application's traffic.
Earlier runs of the pipeline are listed under Runs on the right, so you can also look back at the log of a previous run.
Now point your application at the Application In address. Its traffic arrives at the Application Out address on the other node. To monitor link quality, add KPIs; the KPI page shows every node's KPIs side by side, filtered by node and pipeline.
Step 6: Stream live video
To see the link carry real traffic, stream a webcam from the Sender to the Receiver with GStreamer. GStreamer on the Sender sends video to the Sender pipeline's Application In address, 127.0.0.1:5000. The Receiver pipeline delivers it on port 6000, where a second GStreamer command shows it in a window.
Install GStreamer
On Linux (Ubuntu 24.04 LTS or newer), on both machines:
sudo apt-get install gstreamer1.0-tools gstreamer1.0-plugins-base \
  gstreamer1.0-plugins-good gstreamer1.0-plugins-bad \
  gstreamer1.0-plugins-ugly gstreamer1.0-libav gstreamer1.0-x v4l-utils
On macOS, with Homebrew:
brew install gstreamer
Find your camera
- Linux:
v4l2-ctl --list-deviceslists your cameras; the first is usually/dev/video0. If you get a permission error, runsudo usermod -aG video $USER, then log out and back in. - macOS: cameras are numbered from
device-index=0. The first time, macOS asks whether Terminal may use the camera; allow it.
1. Start the receiver (on the Receiver)
Start this first. The same command works on Linux and macOS:
gst-launch-1.0 udpsrc port=6000 \
  caps="application/x-rtp, media=video, encoding-name=H264, payload=96" ! \
  rtph264depay ! \
  avdec_h264 ! \
  videoconvert ! \
  textoverlay text="NanoPing" valignment=top halignment=center font-desc="Sans, 36" ! \
  autovideosink
It waits for video and opens a window when the first frames arrive.
2. Test with a test pattern (on the Sender)
Before using a camera, check the path with GStreamer's built-in test pattern:
gst-launch-1.0 videotestsrc is-live=true pattern=ball ! \
  video/x-raw,width=640,height=480 ! \
  videoconvert ! \
  x264enc tune=zerolatency ! \
  rtph264pay config-interval=1 pt=96 ! \
  multiudpsink clients=127.0.0.1:5000
A bouncing ball appears in the receiver's window. Press Ctrl+C to stop it.
3. Stream the webcam (on the Sender)
On Linux:
gst-launch-1.0 v4l2src device=/dev/video0 ! \
  video/x-raw,width=640,height=480 ! \
  videoconvert ! \
  x264enc tune=zerolatency ! \
  rtph264pay config-interval=1 pt=96 ! \
  multiudpsink clients=127.0.0.1:5000
On macOS:
gst-launch-1.0 avfvideosrc device-index=0 ! \
  queue ! \
  video/x-raw,width=640,height=480,framerate=30/1 ! \
  videoconvert ! \
  x264enc speed-preset=ultrafast tune=zerolatency intra-refresh=true ! \
  h264parse ! \
  rtph264pay config-interval=1 pt=96 mtu=1100 ! \
  multiudpsink clients=127.0.0.1:5000
What the main settings do:
tune=zerolatencyturns off encoder features that add delay, such as look-ahead and B-frames.config-interval=1repeats the stream headers every second, so the receiver can join at any time.- The macOS command also uses
speed-preset=ultrafastfor faster encoding,intra-refresh=trueto spread keyframe data over many frames so a lost packet does not freeze the picture, andmtu=1100for smaller video packets.
Camera with built-in H.264 (Linux). Many USB webcams can encode H.264 themselves. Then you can skip the encoder and send the camera's stream directly:
gst-launch-1.0 v4l2src device=/dev/video0 do-timestamp=true ! \
  video/x-h264,width=1920,height=1080,framerate=30/1 ! \
  h264parse config-interval=-1 ! \
  rtph264pay config-interval=1 pt=96 mtu=1300 ! \
  multiudpsink clients=127.0.0.1:5000 sync=false
Full HD needs far more bandwidth than 640×480, so check that your links can carry it.
See it working
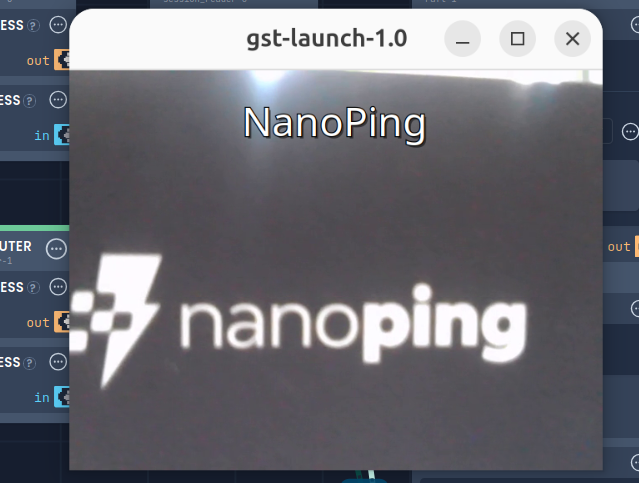
The webcam picture appears in the receiver's window.
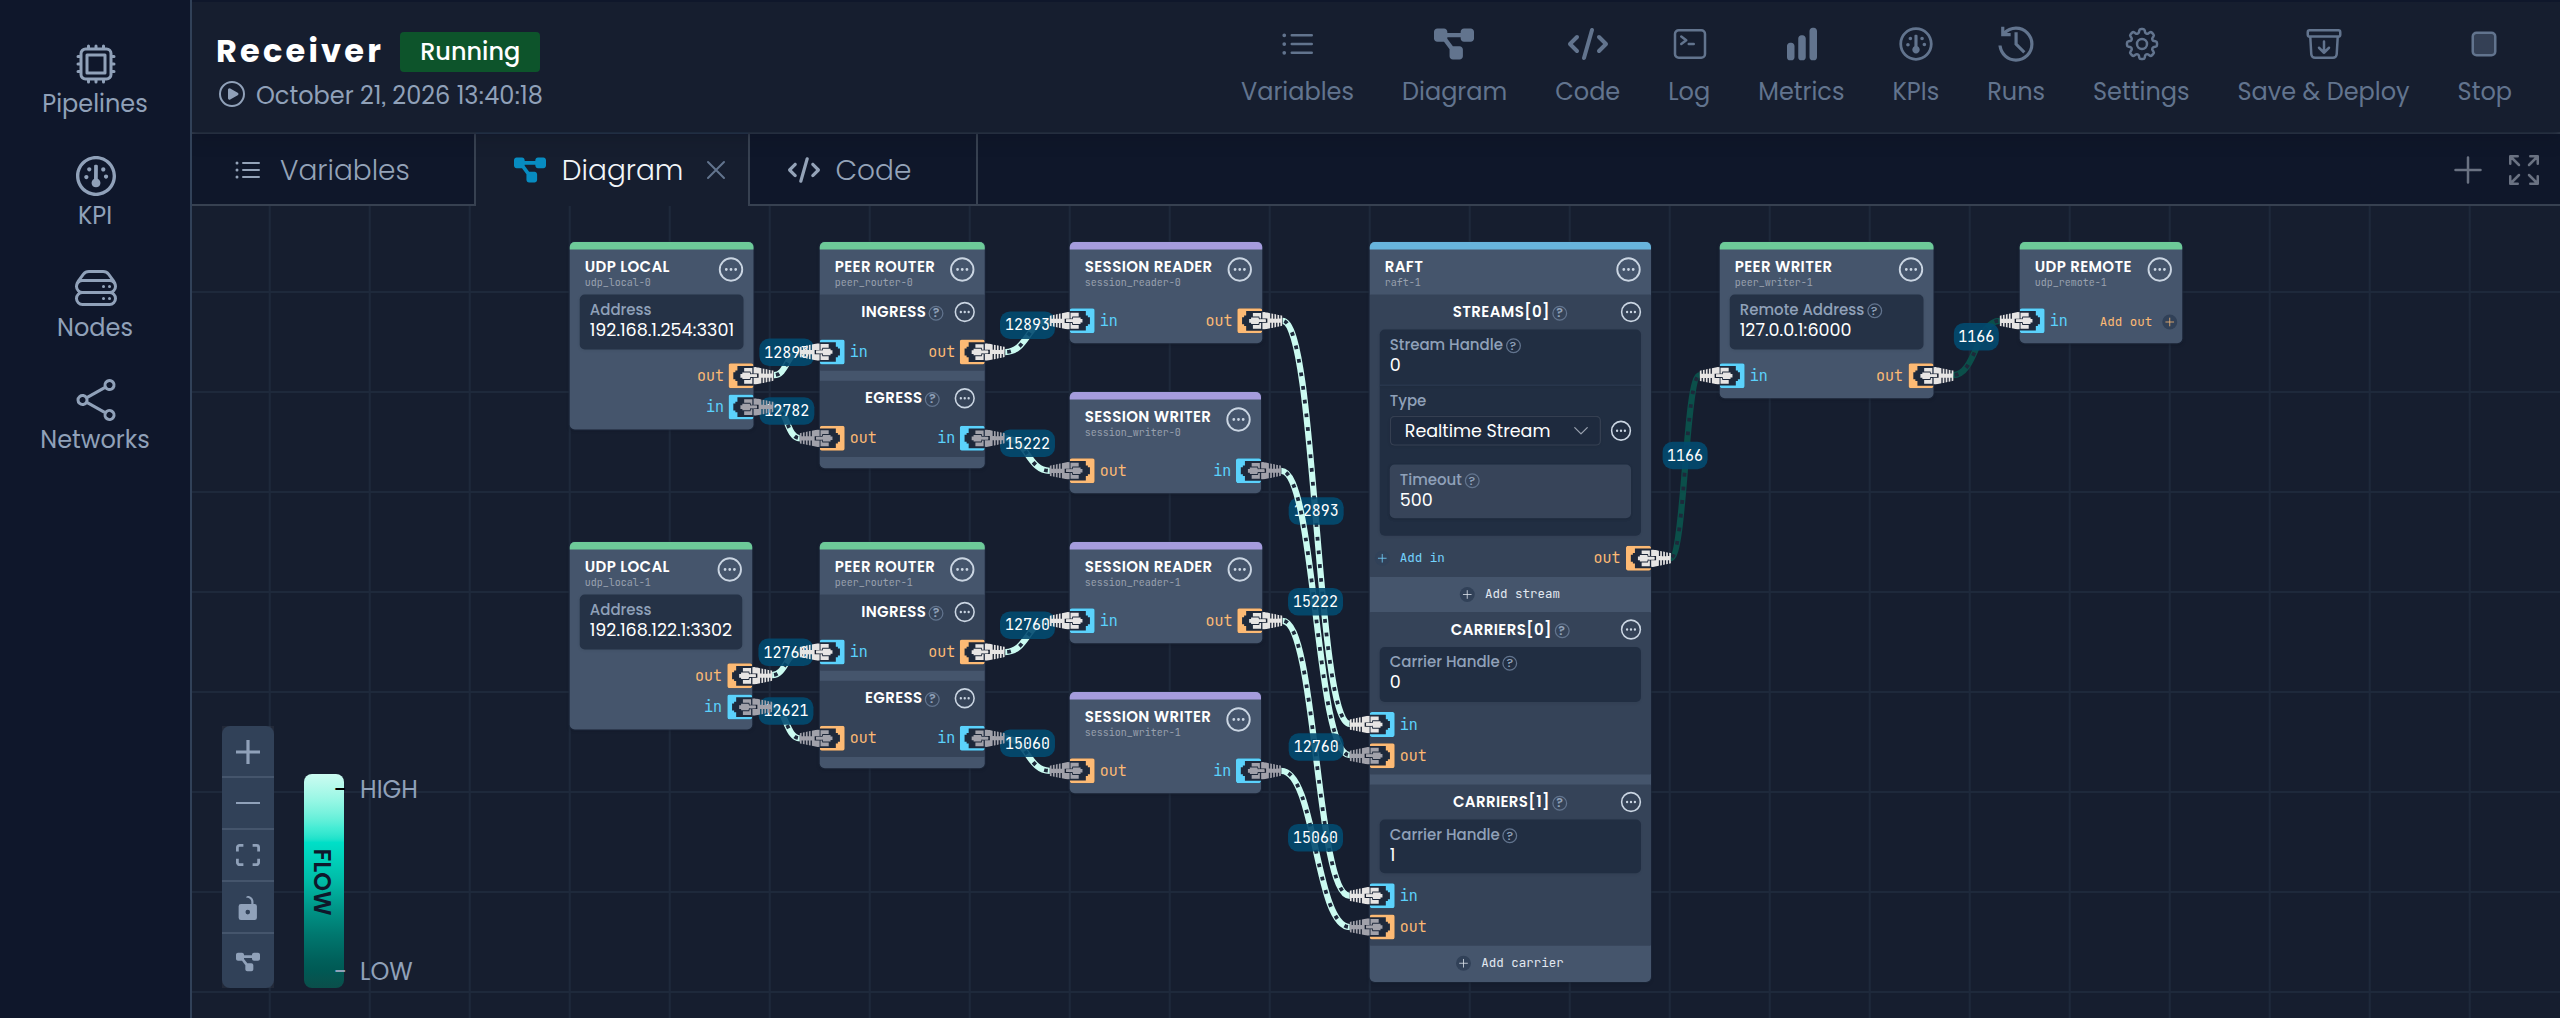
In the pipeline viewer on either node, the links light up as video flows and the numbers on them keep changing. The FLOW scale in the corner shows how busy each link is.
To record instead of display, run this on the Receiver. The -e flag finishes the file cleanly when you press Ctrl+C:
gst-launch-1.0 -e udpsrc port=6000 \
  caps="application/x-rtp, media=video, encoding-name=H264, payload=96" ! \
  rtph264depay ! \
  h264parse ! \
  mp4mux ! \
  filesink location=received.mp4
Smoother playback with Raft's jitter buffer
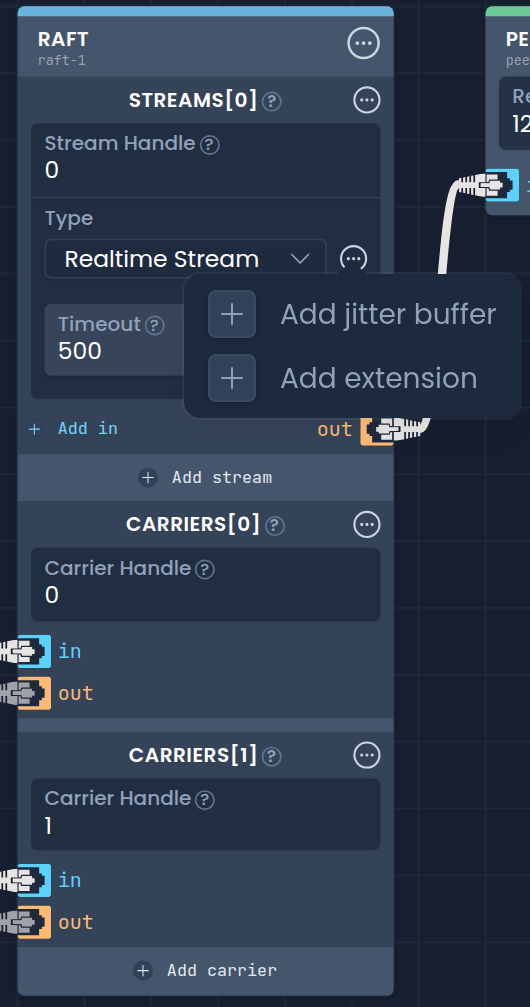
Raft has a jitter buffer built in, so you do not need one in GStreamer. With jitter_buffer set to 0, Raft delivers each frame as soon as it is ready: the lowest latency, but playback can look uneven on a jittery link. If the video stutters, set a jitter buffer on the Receiver's Raft stream, for example 200 ms with a 500 ms timeout. Raft then holds frames briefly for smooth playout and keeps the remaining 300 ms for repairing lost packets. See Jitter buffer integration for details. To set it, open the Receiver pipeline's diagram, click the ⋯ menu next to the stream's Type, and choose Add jitter buffer. A Jitter Buffer field appears below Timeout; enter the value in milliseconds and click Save & Deploy. You can also set jitter_buffer in the pipeline's Code tab.
If no video appears
- The command fails straight away: each line except the last must end with a space and a backslash (
\). If you copied the command from a PDF, check that no line was split or joined. - The window never opens: check that the sender sends to
127.0.0.1:5000and the receiver listens on6000, matching the Application In and Out addresses in your pipelines. not-negotiatederror from the camera: the camera does not support 640×480. Runv4l2-ctl --list-formats-ext -d /dev/video0to see the modes it supports, and adjustwidthandheight.- The picture breaks up: more packets are lost than Raft can repair within the timeout. Check your links, or raise the stream
timeouton both pipelines.
Optional: Start NanoPing at boot
To have NanoPing start at boot and come back if it fails, install it as a service: a systemd unit on Linux, a launchd job on macOS. Stop NanoPing first, then install the service:
sudo np down
sudo np service install
The service keeps NanoPing's data in the same folder as sudo np up, so the node stays claimed and keeps its pipelines. It takes the options of np up and the global ones such as -c, and starts with them every time, for example sudo np -c /path/to/config.yaml service install --grpc 127.0.0.1:10432 to also serve the gRPC API. Run it again to change the options, and run sudo np service uninstall to stop the service and remove it.
On Linux, systemctl status nanoping shows how the service is doing, and journalctl -u nanoping -n 100 --no-pager its log. See Run as a service for more.
Troubleshooting
| Symptom | Likely cause | What to do |
|---|---|---|
macOS refuses to run np | The binary is not from an identified developer | Allow it under System Settings → Privacy & Security (Step 1) |
| A node is missing from the Nodes page | It was activated into another organization, has no internet access, or left the cloud hub | Check the organization at activation, check its connection, or click Join Cloud Hub under Settings → Hub Connection |
| A node shows Needs update or Refused on the Nodes page | The hub turned it away the last time it connected. Needs update means its version of NanoPing is too old for the hub | Update the node. For Refused, the node's log says why, such as a deactivated device |
| Only one node appears in the template | The other node is not on the same hub | Repeat Step 3 |
| No New Session Bound entry | The nodes cannot reach each other on the connection ports, or the Wi-Fi blocks devices from reaching each other | Run the ping test, check addresses and ports in Connections, and open those UDP ports in any firewall |
| No Raft traffic between nodes that used to work | The nodes run different major versions, for example 10.x and 11.x | Upgrade both nodes to the same major version |
| Sessions bind, but no data arrives | The Reliability latency is lower than the real link latency | Raise the latency above your slowest link's latency |
Log warns CPU affinity optimization bypassed or failed on macOS | macOS does not support pinning to a CPU core | Safe to ignore |
| NanoPing is not running after a reboot | NanoPing is not installed as a service | Install it as a service |
| The log reports a problem with the max packet size | An interface on one side has an MTU below 1248 | Set the same MTU on both ends: the smallest interface MTU minus 48 (see Packet size and MTU) |
| Dashboard is not on port 8081 | A config file or --http flag sets a different address | Use the address from http.address or --http |
Packet size and MTU
The connections send UDP packets of up to 1200 bytes, which passes nearly any network, so the Sender and Receiver pick the same packet size without you setting an MTU. Your application can send packets of up to 1452 bytes to Application In: Raft splits them into pieces that fit the connections and puts them back together before Application Out.
Only an interface with an MTU below 1248 lowers the packet size on its side, and the two sides then no longer match. If the log reports a problem with the max packet size, set the same MTU yourself on both ends of every connection: on the UDP Remote components in the Sender pipeline and the UDP Local components in the Receiver pipeline that connect to the other node. Use the smallest interface MTU minus 48.
To find an interface's MTU, run ip link show eth0 on Linux or ifconfig en5 | grep mtu on macOS, using your interface name.
Sending smaller packets from the source is slightly more efficient than having Raft split them, which is why the macOS GStreamer command uses mtu=1100, but on a real-time stream the difference is small.
Stopping NanoPing and next steps
To stop NanoPing, run sudo np down (add --app-data if you used a custom folder). This also stops a node installed as a service, which then starts again at the next boot. To leave or rejoin a hub, see Leaving a hub.
Once your link works, you can tune it further:
- Prefer one link and use others only for overflow with carrier priorities.
- Save working pipelines and blueprints to the cloud library and deploy them on any node.
- Choose a repair strategy for lossy links with FEC.
- Explore the Components and Reference Setups.