TUN to UDP Tunnel (Optimized)
This guide explains how to set up an optimized TUN-over-UDP tunnel between two NanoPing devices.
Unfamilar with TUN read more here
In this setup, we'll use NanoPing's optimized transport protocol, Raft. Raft offers several advantages over a plain UDP transport.
Specifically, we'll take advantage of Raft's RealTime stream, which provides the following key features:
-
Latency budget — Specifies the maximum end-to-end latency that packets in the tunnel are allowed to experience.
-
Adaptive FEC + ARQ — Ensures reliable connectivity whenever possible by dynamically adjusting forward error correction and retransmissions.
-
Multi-carrier support — Allows multiple network interfaces to be combined. This increases path diversity and adds robustness against network outages and disturbances. In the example below, we use two carriers, but NanoPing’s transport can utilize as many interfaces as are available.
System Requirements
The setup requires two devices:
- Client – Sends packets to the server.
- Server – Receives packets from the client.
Once the connection between the client and server is established (i.e., the client has sent the first packet), communication becomes bidirectional.
Configuration
The setup involves two pipelines:
Client Pipeline
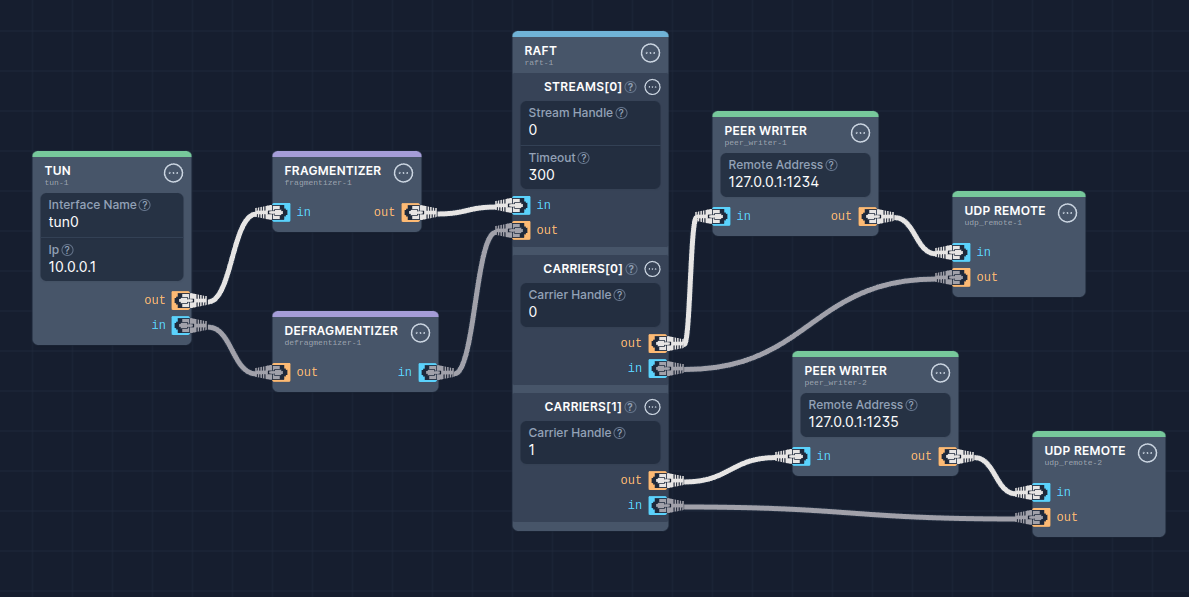
This pipeline reads packets from the TUN interface (tun0) and sends them to the remote address specified in the PEER_WRITER component.
Configuration Steps
-
Update the Remote Address – In the
PEER_WRITERcomponents of the pipeline, update the Remote Address field to match the actual IP address where the Server will be running.tipIn this setup, there are two
PEER_WRITERcomponents. For optimal performance, each should use a different network interface. This provides redundancy—if one interface encounters issues, the other can maintain the connection. -
Download the Client Pipeline – Download here
-
Import the Pipeline – Go to the pipeline overview in your NanoPing instance and upload the downloaded pipeline file.
Server Pipeline
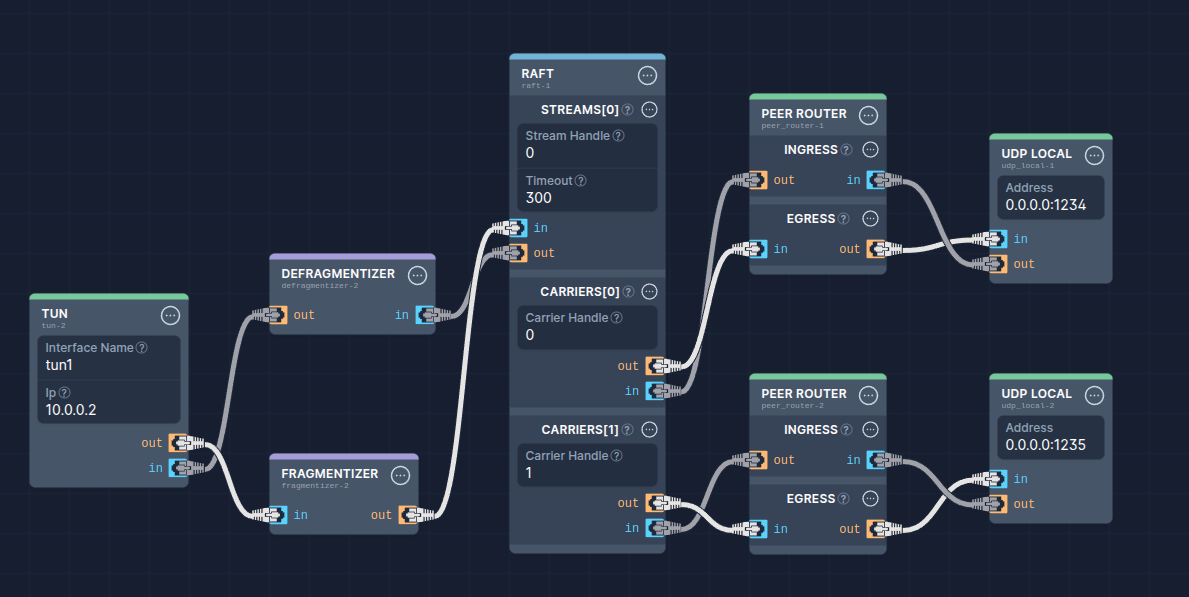
This pipeline reads packets from the UDP_LOCAL component and forwards them to the TUN interface (tun1) for processing by the Linux network stack.
Configuration Steps
- Download the Server Pipeline – Download here
- Import the Pipeline – Upload the downloaded pipeline to your NanoPing instance via the pipeline overview.
- Update the UDP Local Address – Modify the Address field of the
UDP_LOCALcomponent to match the interface on the server that will be used for reading packets.
By following these steps, you'll establish a TUN-over-UDP tunnel enabling bidirectional communication between your NanoPing devices.
Read more: To use this setup as a VPN, follow the guide on TUN Interface Setup with iptables.
The pipelines shown here do not include components for encryption or authentication. Use them for testing and evaluation purposes only.
Testing Connectivity
🎉 Congratulations! Your TUN-over-UDP tunnel is now successfully set up.
You can now verify and evaluate the performance of your tunnel. There are many ways to do this—below are two recommended methods using ping and iperf3:
-
Test tunnel performance with iperf3 Measure throughput, packet loss, and jitter using TCP or UDP traffic.
-
Test tunnel performance with ping Check connectivity and measure round-trip time (RTT) between endpoints.